Decoupage Napkins for Baby Decorations
Make your child’s christening table unique and memorable. For this special day, we offer you unique designs and many types of napkins. With their fine texture, they can be used not only for arranging a holiday table, but also for making various figures, flowers, appliqués. The decoupage technique is very widespread and a major role is assigned to them.
View more
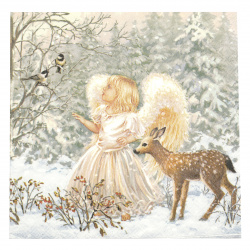
Decoupage Napkin Ambiente “Winter Angel“, 3-Ply, 33x33 cm - 1 piece
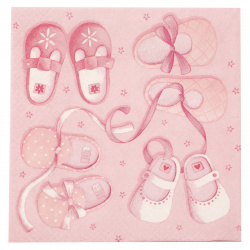
TI-FLAIR Paper Napkin – Baby Girl “New Arrival” Pink with Baby Shoe Pattern, 33x33 cm, 3-Ply, 1 pc – For Decoupage, Crafts & Baby Shower Party Decor
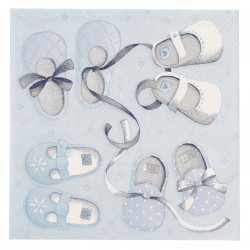
Ti-Flair Paper Lunch Napkin 33x33 cm, 3-Ply, New Arrival Baby Boy Design – 1 Piece, for Baby Shower, Newborn Party, Decoupage Crafts

Napkin for Decoupage Decoration, 3-ply, 33x33 cm, 1 piece
Napkins and Decoupage
Ready to start decoupage? Some crafters believe that decoupage with napkins can be difficult... and takes time to learn. However, at EM ART, we assure you that with a bit of patience and determination, you’ll master napkin decoupage in no time!
Top reasons to choose napkins for decoupage:
- Decoupage napkins with christening themes from EM ART stores are budget-friendly.
- They come in beautiful, enchanting designs.
- You can create delicate projects with a unique look that differs from scrapbook paper or fabric.
Once you learn to decoupage with napkins, you’ll fall in love with this craft! We want to share some of the process and a few tips gathered from various techniques.
Tips for Working with Christening-Themed Decoupage Napkins
Separate the layers of the napkins before you begin. This means peeling away the (usually) white backing layer from the printed front layer. Gently rub the layers to separate them or use a piece of tape in one corner and pull.
You can cut or tear your images. To tear them, use a detail brush, dip it in water, and outline the part of the image you want to keep. This method allows the napkin to separate easily.
Apply a layer of special glue to your object’s surface, then place the napkin (or part of the napkin’s design) onto the glue. Use a piece of plastic wrap over the napkin to smooth it out. This helps to flatten the napkin without tearing it. Work from the center outward.
Alternatively, some crafters spray hairspray onto their napkins before decoupaging. Apply several layers of hairspray, letting each layer dry completely. The pressure of your brush is crucial. Don’t press too lightly, as this weakens the napkin, but don’t press too hard, as this could tear it. Practice and patience are key!
Always finish with light sanding and varnishing after completing your project. If applying napkins to tile coasters, allow the glue to dry and smooth out the surface.
This ensures your project has no uneven areas. Some crafters use teflon sheets between the napkin and the iron, but you can also use a cloth.
How to Decoupage Christening Glasses
Protect your workspace with a craft mat or newspapers. If you want to protect your table, desk, or countertop from glue spills, it’s a good idea to lay down a protective layer before starting your project.
A craft mat is ideal for safeguarding any surface, but layers of newspaper will work just as well. Alternatively, you can cut open a trash bag along two seams and lay it flat if you don’t have newspapers or a craft mat.
Clean the glass item with soap and water, then with alcohol. Dust, residue, and skin oils can interfere with how well the glue adheres to your project.
To avoid this, wash the piece you intend to decorate with soap and water, then dry it with a lint-free towel. Wipe the glass surface with an alcohol-based solution and let it dry completely again.
Choose and cut out your designs. For decoupage, there is no right or wrong—if you like the design, you can use it!
Decide whether to use several small pieces, one large piece or layer multiple pieces for a background. Once decided, cut the image to fit the glass.
If decorating a curved piece of glass, consider the curve when determining the size of your paper. Avoid using glossy images, like magazine pages. The coating on such paper may cause tearing when glue is applied.
When you apply wet decoupage glue to the paper, it becomes fragile and may tear. If using standard napkins or paper, even a small tear could ruin your project. We recommend using special christening-themed napkins available at EM ART.
Decoupage Techniques for Christening Candles
Our specialists recommend following these guidelines. First, clean the candle you’ll be working on—it’s best to use a lighter-colored candle, such as white or beige. Remove any dust that may be present.
If working with a napkin, cut out your desired design and separate the two layers, as you’ll only use the top layer (the one with the image). If using rice paper, cut out the desired motif.
Heat a spoon over a flame (using another lit candle). Position the chosen motif in the correct spot. Use the heated spoon to smooth the design onto the candle, starting from the center and working outward, removing any air bubbles that may form.
Take care not to tear the motif. If the spoon blackens, avoid using it further as it may stain your design. Instead, clean or replace the spoon. Heat transparent paraffin wax in an old, unused pot to 100°C.
Once completely melted, dip half of the candle into the liquid, count to 3, and remove it quickly. Wait for 1 minute, then dip the other half. Place the candle carefully onto aluminum foil and avoid touching it for at least 30 minutes.
Keep in mind that decoupage techniques require practice. Your first attempt may not be perfect. Air bubbles often appear overnight and can ruin your masterpiece.
For best results, after step 4, leave the candle overnight. If no bubbles appear, proceed to step 5 the next day. If bubbles do form, pierce them with a needle, smooth them out again with a heated spoon, and dip the candle in paraffin once more.
Types of Christening-Themed Decoupage Napkins from EM ART
At EM ART, you’ll find a wide selection of christening-themed decoupage napkins in various colors. With our offerings, you can create stunning decorative elements for your celebration.
Prices for Christening-Themed Decoupage Napkins from EM ART
EM ART’s christening-themed decoupage napkins come at affordable and accessible prices. Take advantage of our promotional prices, discounts for bulk purchases, and up to -70% off when shopping wholesale at EM ART stores.
Why Choose Us?
At EM ART, you’ll find a vast array of materials to inspire your creativity. Select your products easily using our filtering tools, browse new arrivals, top products, and discounted items effortlessly.
Receive expert advice about product availability and answers to any questions regarding your purchase. If you’re seeking inspiration for your projects, visit the EM ART blog. Turn your celebrations into unforgettable moments.
What We Offer:
Wide Range of Products
Our stores provide a complete range of products for your hobby projects, and we’ll be happy to help you select the best solutions for your work.
Reliability
At EM ART, you’ll find only authentic products with guaranteed origin. We are professionals who aim to provide a variety of high-quality products to ensure your security and investment protection.
Experience and Expertise
For many years, we’ve worked with individuals, small, medium, and large clients. Regardless of the task, we approach each case personally. We are proud of our team of young yet experienced specialists who understand the conditions in our field, enabling us to offer the most suitable products for your needs.
Care
When purchasing materials from us, you trust a reliable partner who remains available even after the sale. We’ll answer all your questions and provide professional care for your crafting material needs.
Order and Delivery
You can place your order anytime—24 hours a day, 7 days a week. Your package will arrive within a few business days. Provide a convenient address, whether it’s your home or a courier office.
Benefits of Online Shopping
Comfort and convenience—there’s nothing like shopping from the comfort of your own home compared to the hassle of crowded stores. Comparing products, analyzing, and evaluating them is much easier from your computer at home or office than in busy and packed stores.
This advantage of online shopping is particularly valuable during cold winter days or the holiday rush.
Time-saving—it’s a significant benefit for busy individuals. Instead of endless shopping trips, you can browse conveniently during your coffee break or evening at home.
Cost-saving—online shopping often features lower markup prices than physical stores. Additionally, various payment methods are available, such as cash on delivery, bank transfer, card payment, or postal order.